This guide walks you through the entire process of registering your clinic, from the initial application to final approval. You will receive six emails throughout this process.
Clinic Administrator
Clinic Administrator Portal Guide
Complete step-by-step guide for clinic administrators to register, manage studies, and operate the CSR platform.
Clinic Registration & Administrator Portal User Guide
1. How to Access the Website
Overview: Navigate to ClinicalStudyResearch.com to begin your clinic registration.
Steps:
- Open your browser and navigate to: https://clinicalstudyresearch.com
- On the homepage, click the Apply button.

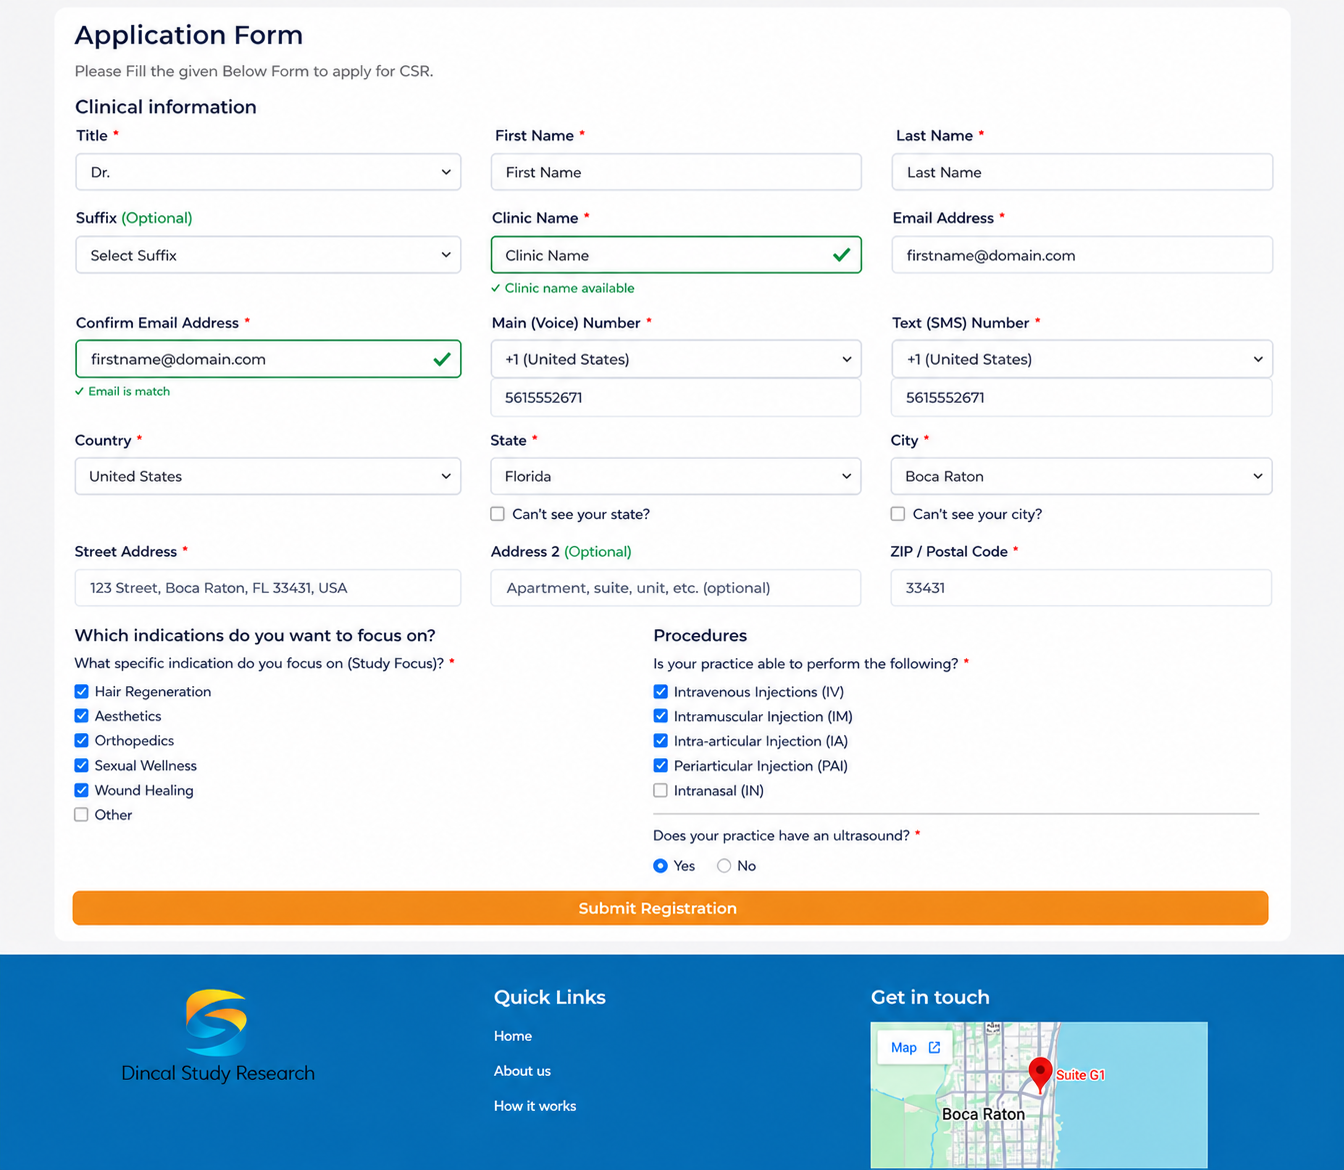
2. How to Complete the Application Form
Overview: Fill out the Clinic Registration Form with your personal and clinic information.
Steps:
- After clicking Apply, you will be redirected to the Clinic Registration Form.
- Fill in all required details:
- Personal Information: Name, Email, Phone
- Clinic Information: Clinic name, address, contact details
- Study Focus & Procedures
- Ensure all required fields are completed correctly.
- Click Submit to complete your application.
3. Application Submission Confirmation (Email #1)
Overview: After you submit, you will receive a confirmation email from CSR.
What this email confirms:
- Your application has been received
- Your application is under review
What to do:
- No action required at this stage
- Keep this email for your records
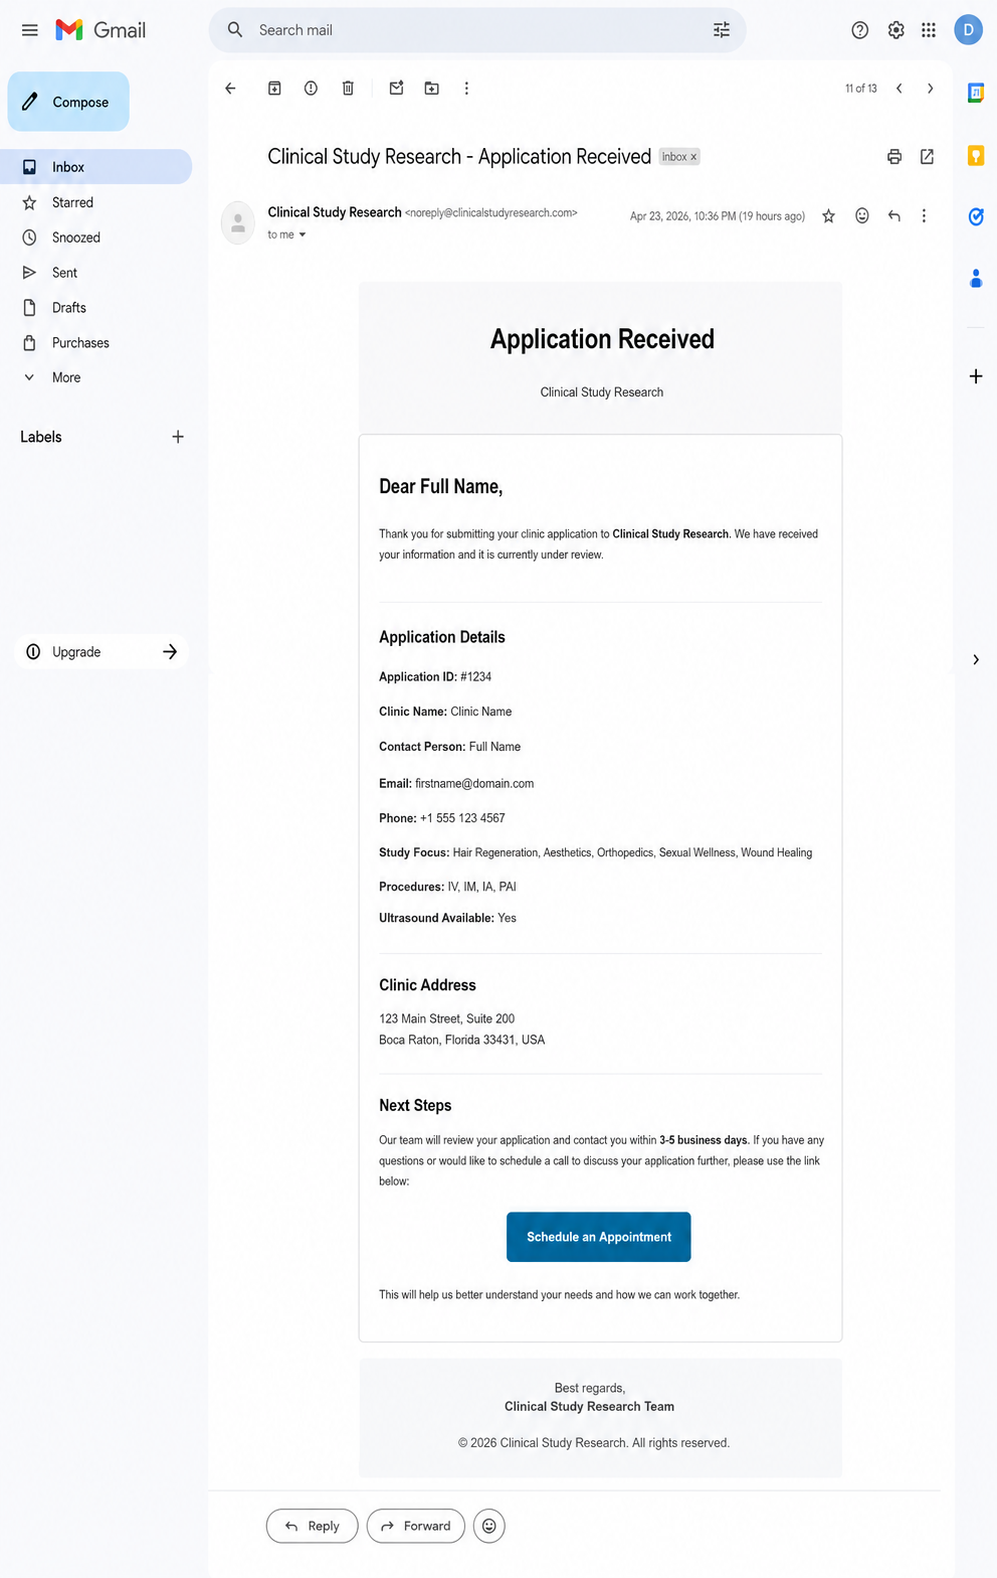

Important Note: This is the first of six emails you will receive throughout the registration process.
4. How to Sign the Initial Document – Affidavit (Email #2)
Overview: You will receive a separate email requesting that you sign an affidavit.
Steps:
- Open the email titled "Please Sign Your Affidavit Document."
- Click the Sign Document button inside the email.
- Complete the required signature process as directed on screen.
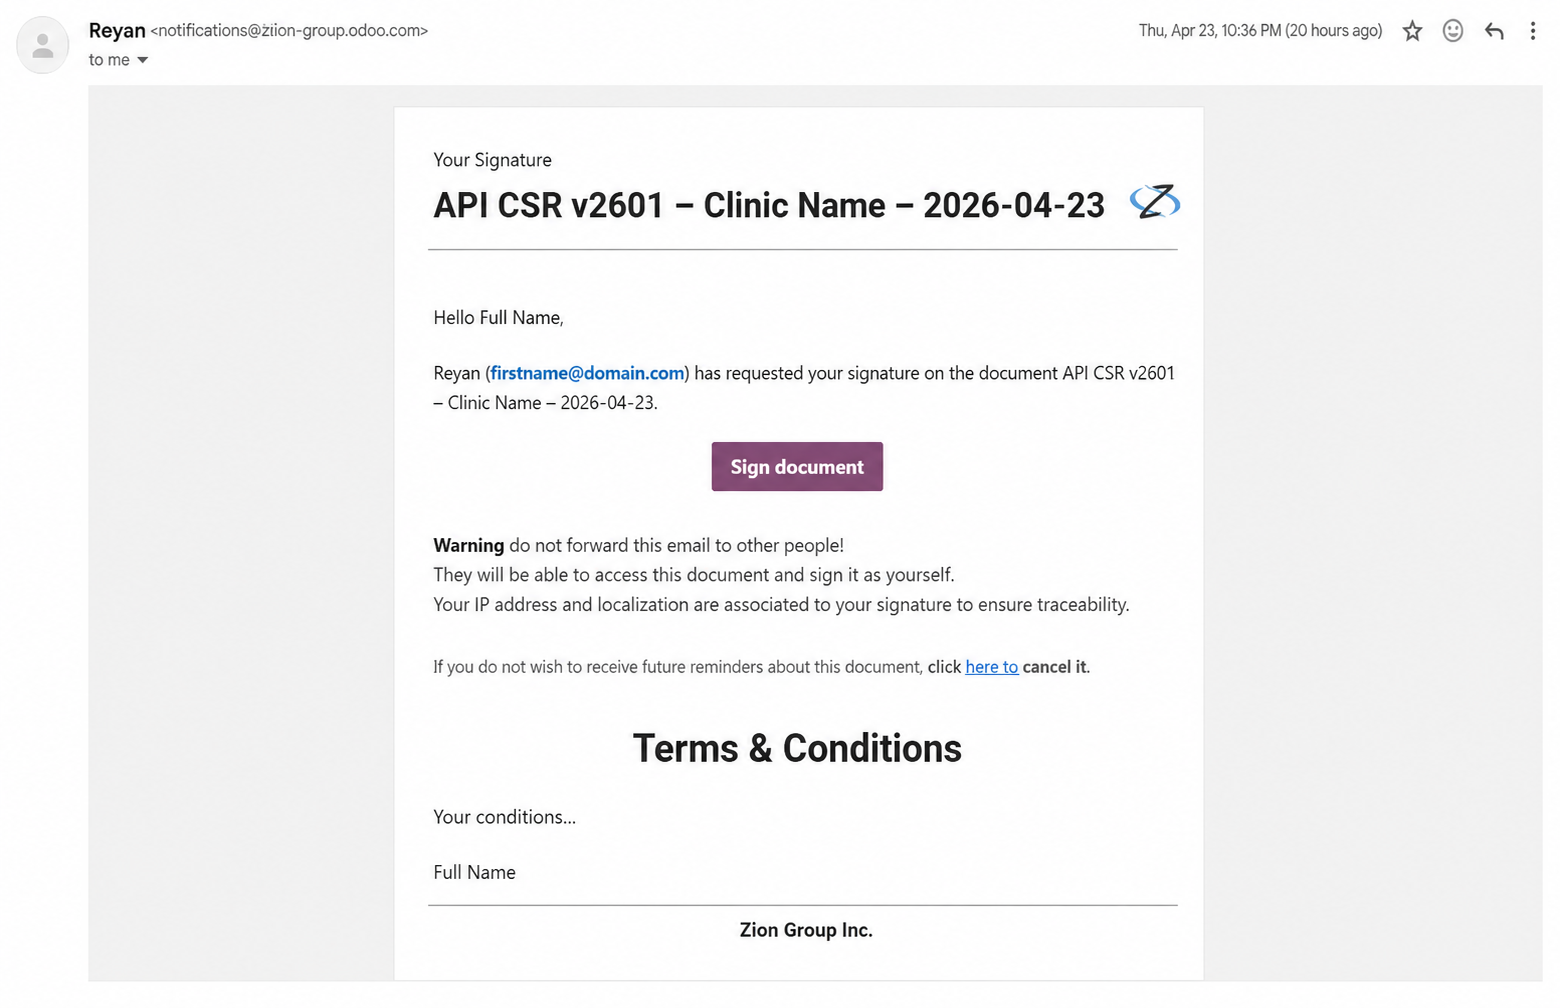
Important Note: The document is called an Affidavit (also referred to as API in some system references). This is mandatory for application review.
5. Application Review by Admin
Overview: The admin team will review your application, including your form and signed affidavit.
What happens:
- Admin verifies all information
- Admin checks document signatures
- If approved, you will receive two emails:
- Approval Email (Email #3)
- Next Steps Email (Email #4)
- If there are issues, you will not receive any notification or message.
6. Approval Email (Email #3)
Overview: This email confirms that your clinic application has been approved. It also includes a secure link to set your account password.
What this email includes:
| Information | Description |
|---|---|
| Clinic Name | Your clinic's registered name |
| Clinic Code | Important identifier for your clinic |
| Username | Your portal login username |
| Role | Clinic Administrator |
| Password Setup Link | Secure link to create your account password |
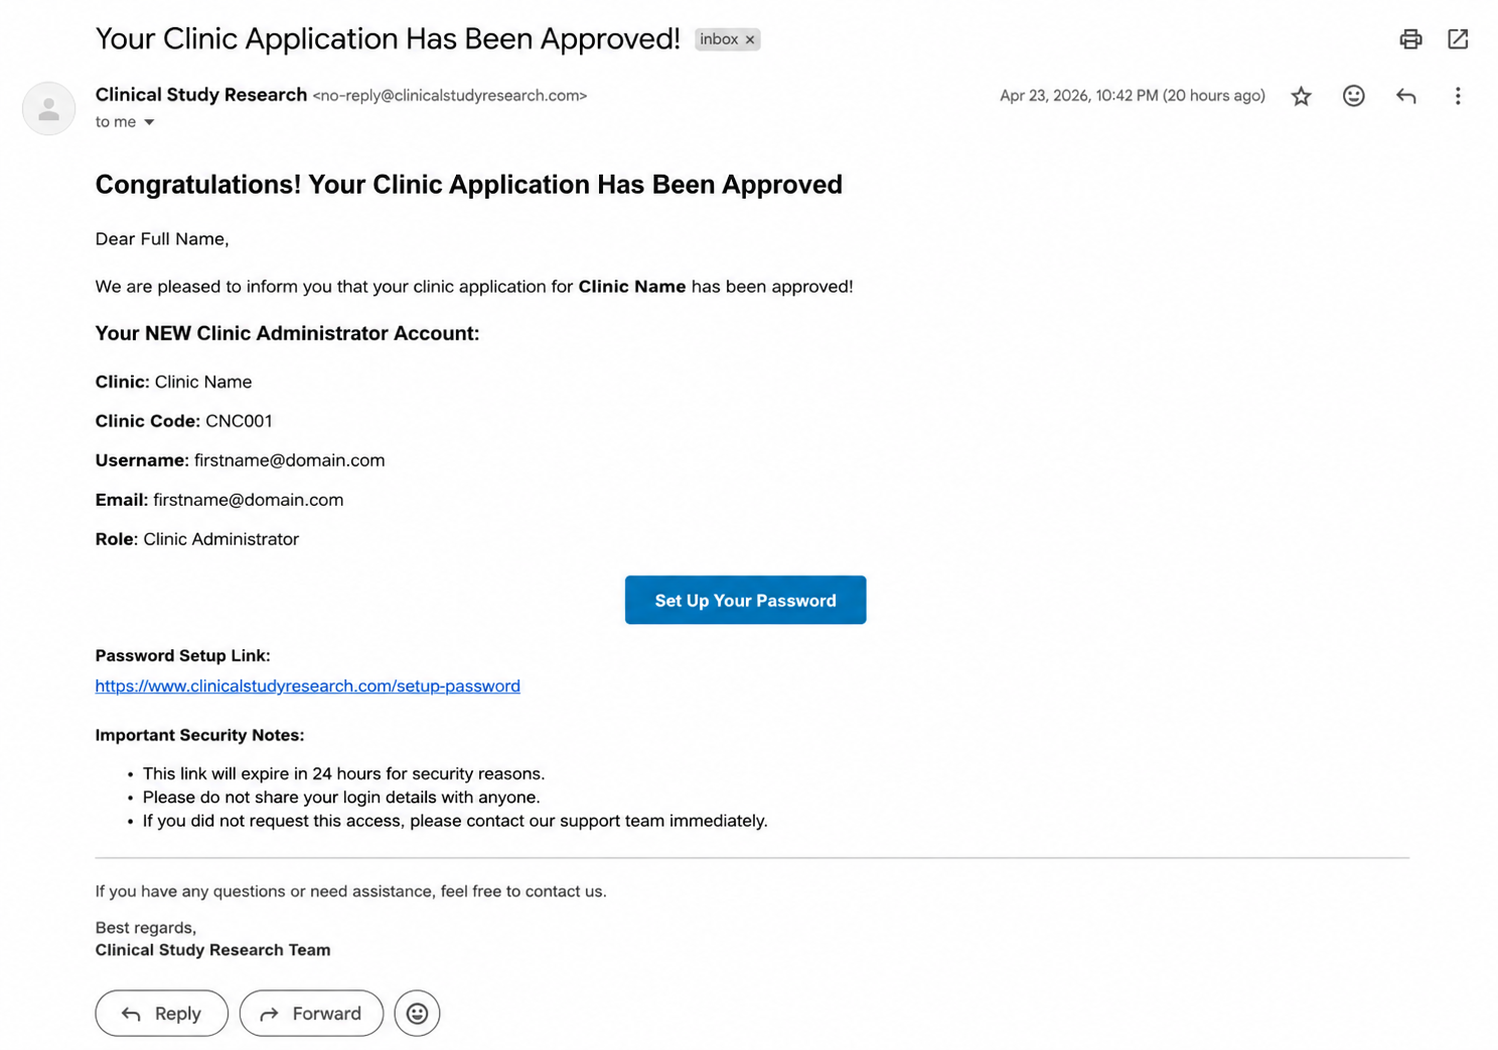
What to do:
- Save this email. You will need these credentials and the Clinic Code for future logins to the clinic.
- Click the password setup link inside the email.
- Create your account password by following the on-screen instructions.
- After setting your password, you can log in to the Clinic Administrator Portal using your email and the password you just created.
- Do not share your username/password with unauthorized individuals.
⚠️ Important Notes:
- You must click the password setup link before you can log in for the first time.
- The link is secure and time-sensitive. If it expires, contact the admin team for a new link.
- Your Clinic Code is an important identifier – keep it for your records, as it may be needed for doctor and patient invitations.
7. Next Steps Email (Email #4)
Overview: This email provides instructions for what to do after approval.
Follow the instructions provided in the Next Steps email:
- Log in to your account with the credentials provided in the Approval Email (Email #3), then go to the marketing page and fill out the form.
- Visit the portal link included in this email
- Complete required forms (e.g., IRB Participant Form, Marketing form)

Important Note: The IRB Participant Form and the marketing page form must be completed before proceeding with document signing and payment.
8. How to Sign Additional Documents (Emails #5 & #6: BAA and RSA)
Overview: You will receive additional emails requesting your signatures for two important agreements.
The documents you must sign:
| Email # | Document Name | Full Name |
|---|---|---|
| Email #5 | BAA | Business Associate Agreement |
| Email #6 | RSA | Research Site Agreement |
Steps:
- Open each email separately.
- In each email, click Sign Document.
- Complete the signature process for each document.
- Repeat for both the BAA and RSA emails.
✅ Action Required: Open each email and click Sign Document to complete the process for BOTH agreements.


Important Note: You must sign BOTH documents. The system tracks each signature separately. Your application is not complete until both documents are signed.
9. How to Complete Payment
Overview: Ensure your payment status is marked as Paid in the system.
Steps:
- Complete the payment process.
- Verify that your payment status is marked as Paid in the system.
Important Note: The admin team can view your payment status. Do not proceed until payment is confirmed as "Paid."
10. Final Approval & Account Access
Overview: Once all conditions are met, the admin will verify your submission and grant final approval.
Conditions that must be met:
✅ All documents are signed:
- Affidavit (API) – from email #2
- BAA (Business Associate Agreement) – from email #5
- RSA (Research Site Agreement) – from email #6
✅ Payment is completed and marked as "Paid."
After final approval:
- You can log in to your Clinic Administrator Account
- You will have full access to the Clinic Administrator Portal
This guide explains how to use your Clinic Administrator account after final approval.
11. Access Requirements (Pre-Login Checklist)
⚠️ Important Requirement: You can only log in to the Clinic Administrator Portal when ALL the following conditions are met:
Document Requirements:
✅ Affidavit signed and approved
✅ BAA (Business Associate Agreement) signed and approved
✅ RSA (Research Site Agreement) signed and approved
Payment Requirements:
✅ Payment status is marked as Paid
Admin Approval:
✅ Once all conditions are met, the admin will approve your account
Result: You can now log in to the Clinic Administrator Portal.
12. How to Log in to the Portal
Overview: Access your clinic's administrative dashboard with the credentials in your Approval Email.
Steps:
- Go to the login page provided in your Approval Email (Email #3).
- Enter your Email and Password.
- After successful login, you will be redirected to the Dashboard.

Troubleshooting:
- If you cannot log in, verify that all Access Requirements (Section 11) are met
- Check that you are using the correct credentials from the Approval Email
13. Dashboard Overview
Overview: The dashboard is your main control panel. On the dashboard, you can view key metrics for your clinic.
Key metrics displayed:
| Metric | Description |
|---|---|
| Total Doctors | Number of physicians added to your clinic |
| Total Patients | Number of patients added to your clinic |
| Active Episodes | Number of active patient cases |
| Follow-ups | Number of pending or completed follow-ups |
👉 This is your main control panel for monitoring clinic activity.

14. How to Manage Specializations
Overview: Specializations define the medical areas or types of expertise for doctors at your clinic. Before adding doctors, you must create your specializations. These will appear as a dropdown menu in the Doctor form, ensuring consistency and accurate data entry.
14.1 How to Add a New Specialization
Steps:
- From the left sidebar, click Specializations.
- The Specializations page will open, showing any existing specializations.
- Locate the Add Specialization button at the top or bottom of the page.
- Click Add Specialization.
- A form or input field will appear. Enter the specialization name (e.g., "Pain Management Specialist", "Orthopedic Surgeon", "Neurologist").
- Click Save or Submit.
✅ The new specialization will immediately appear in the specializations list


14.2 How to View the Specializations List
Overview: After adding specializations, the system displays them in a formatted list or table so that you can see all available options at a glance.
What the list displays:
| Column | Description |
|---|---|
| Specialization Name | The name you entered (e.g., "Pain Management Specialist") |
| Date Created | When the specialization was added |
| Status | Active or Inactive (if applicable) |
| Actions | Buttons to View, Edit, or Delete |
Example of how data appears:

14.3 How to Edit an Existing Specialization
Overview: If you need to change a specialization name (e.g., to correct a typo or update the title), you can edit it at any time.
Steps:
- From the left sidebar, click Specializations.
- Find the specialization you want to edit in the list.
- In the Actions column, click the Edit button (usually represented by a pencil icon ✏️ or the word "Edit").
- The specialization name field will become editable.
- Type the corrected or updated name.
- Click Save or Update.
✅ The specialization name will be updated immediately in the list. Any doctors already assigned to this specialization will automatically show the updated name.


14.4 How to View a Specialization
Overview: When you click the View button for a specialization, a modal window opens, displaying the specialization name and a list of all doctors assigned to that specialization. This helps you see which doctors are associated with each specialty area.
When to use this feature:
- To check which doctors are assigned to a specific specialization
- To verify specialization details before editing or deleting
- To audit doctor distribution across specialties
Steps to View a Specialization
| Step | Action |
|---|---|
| 1 | From the left sidebar, click Specializations. |
| 2 | The Specializations page opens, showing a list of all specializations. |
| 3 | Find the specialization you want to view in the list. |
| 4 | In the Actions column, click the View button. |
| 5 | A modal window opens, displaying the specialization details. |


15. How to Manage Medical Professionals
Clinic Administrators can add medical professionals to their clinic via the portal. When someone is added, the system automatically sends a Welcome Email.
15.1 Steps to Add a Medical Professional
Overview: Add a physician to your clinic.
Steps:
- From the left sidebar, click Doctors.
- Click Add Doctor.
- Fill in the required information:
Personal Information:
- Title (e.g., Prof., Dr.)
- First Name
- Last Name
- Specialization (select from the list you created in Section 14)
- Medical License Number
- NPI Number
Contact Information:
- Email Address
- Confirm Email Address
- Phone Number
- Country
- Click Submit or Save.

15.2 Doctor Email Notification Workflow (Automatic)
✅ When a Clinic Administrator adds a medical professional, the system automatically sends a Welcome Email to the doctor.
The Welcome Email includes:
| Information Included | Example |
|---|---|
| Clinic Name | Your Clinic's Name |
| Clinic Code | Unique identifier for your clinic |
| Username | Doctor's email address |
| Email Address | Doctor's email address |
| Role | Physician |
| Password setup link | Secure link to create a password |
Account Setup Flow for Doctors:
- The doctor receives the email with a secure setup link.
- They click the link and create their account password.
- After setup, the doctor can log in to the Doctor Portal to manage their activities.

Important Note: You do not need to manually create a password for the doctor. The system handles this automatically via the email link.
16. How to Manage Doctor Documents
Overview: After adding a doctor, the Clinic Administrator can upload, view, download, replace, and delete doctor-related documents. All documents are securely stored and tracked.
16.1 How to Access a Doctor's Documents
Steps:
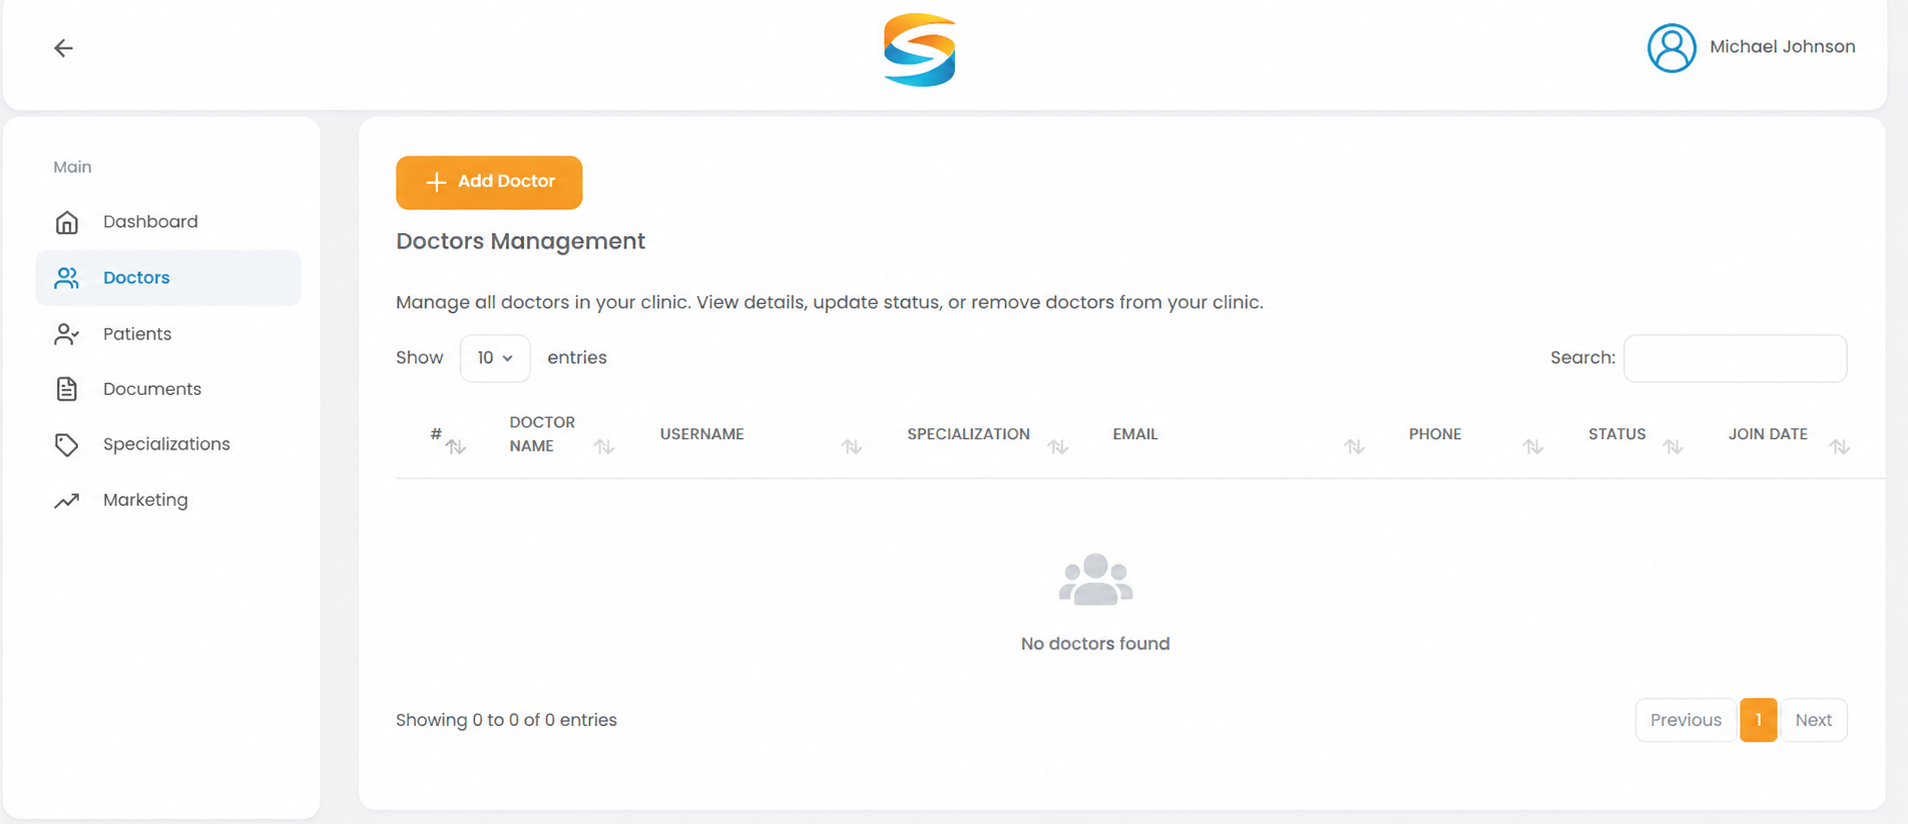
- From the left sidebar, click Doctors.
- The Doctors Management table displays all doctors in your clinic.
- Locate the doctor whose documents you want to manage.
- Click on the Documents section.

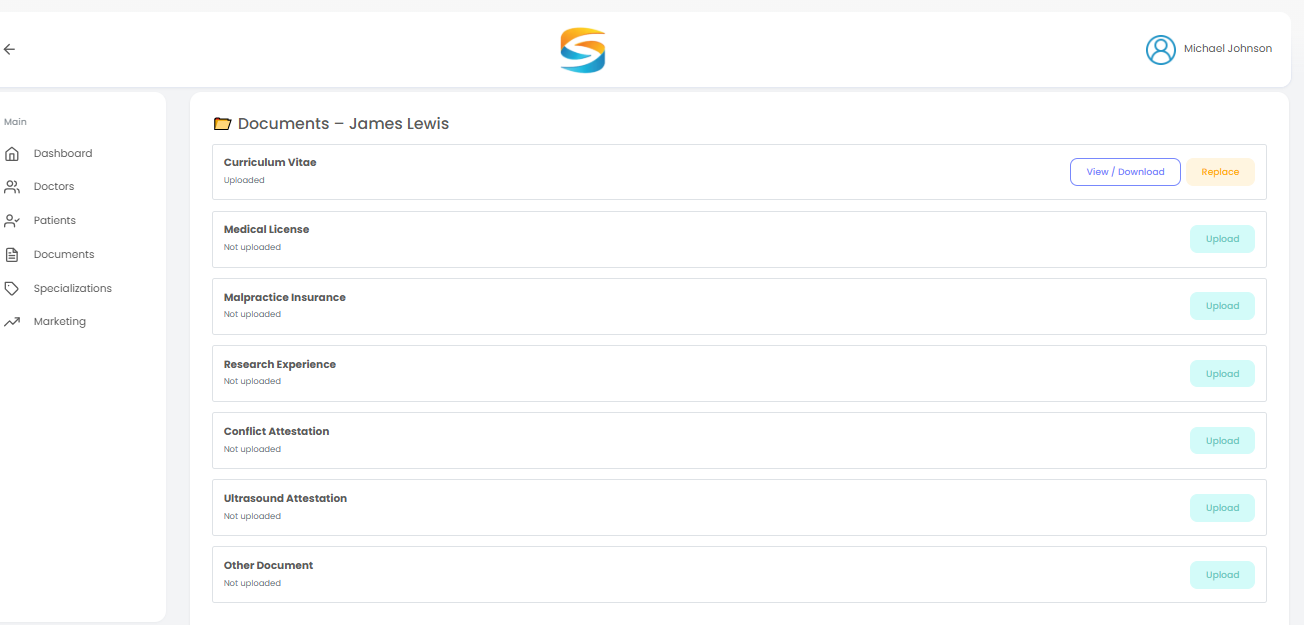
16.2 Available Document Types
- Curriculum Vitae (CV)
- Medical License
- Malpractice Insurance
- Research Experience
- Conflict Attestation
- Ultrasound Attestation
- Other Documents
Actions Available:
- Upload documents
- View / Download uploaded files
- Replace existing documents
16.3 How to Upload a Document
Overview: Upload individual documents for each doctor. Each document type allows one file at a time (uploading a new file replaces the previous one).
Steps:
- Navigate to the doctor's Documents section (see Section 16.1).
- Locate the document type you want to upload (e.g., "Curriculum Vitae (CV)").
- Click the Upload button next to that document type.
- A file browser window opens.
- Select the appropriate file (supported formats: PDF, DOC, DOCX, JPG, PNG).
- The file name appears next to the upload button.
- Click Save.
✅ The document is uploaded and saved to the doctor's record.

16.4 How to View a Document
Overview: After uploading, you can view the document directly in your browser (for PDFs and images) or download it to your computer.
- In the Documents section, locate the uploaded document.
- Click the View/Download button next to the document.
- The file saves to your computer's default download folder.

16.5 How to Replace an Existing Document
Overview: When you need to update a document (e.g., a new CV or a renewed medical license), you can replace the old file. The system retains only the most recent version.
Steps:
- Navigate to the doctor's Documents section.
- Locate the document type you want to replace (e.g., "Medical License").
- Click the Replace button.
- Select the new file from your computer.
- Click Save Changes.
✅ The old document is replaced with the new one. The upload date updates to the current date.
💡 Tip: Upload required documents (CV, Medical License) immediately after adding a doctor to ensure compliance.
16.6 How to View Doctor Details
Overview: Click the View button (👁️) to see complete information about a specific doctor.
Steps:
- In the Doctors table, locate the doctor you want to view.
- In the ACTION column, click the View button (👁️ eye icon).
- The Doctor Details page opens, displaying all information for that doctor.

16.7 How to Remove a Medical Professional from the Clinic
Overview: If someone leaves your clinic or was added in error, you can remove them. The system displays a confirmation dialog before removing them.
Steps:
- From the doctor's table, locate the doctor you want to remove.
- Click the Remove or Delete button (typically at the bottom of the page or in the Actions menu).
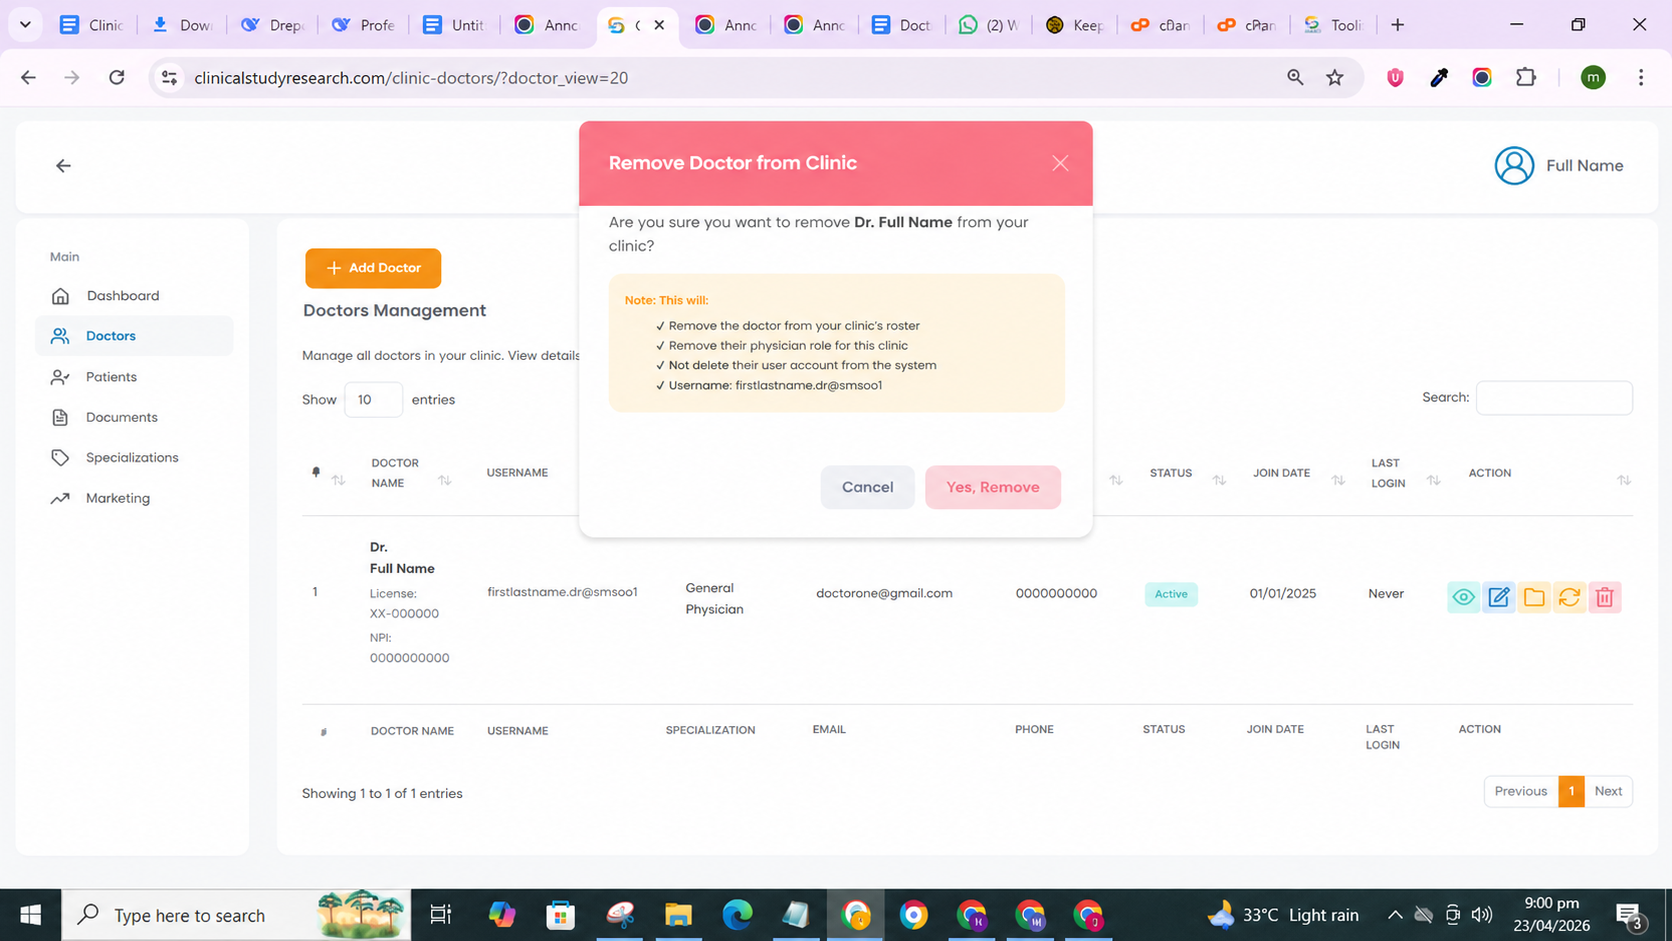
- A confirmation dialog appears with the following message:
Remove Doctor from Clinic
"Are you sure you want to remove Dr. James Lewis from your clinic?"
- Click Yes, Remove to confirm removal.
- Click Cancel to abort the operation.
💡 Best Practice: Before removing someone, reassign their patients to another physician to ensure continuity of care.
16.8 Search Functionality in Doctors Management
Overview: Use the search bar to quickly find specific doctors by name, email, or username.
Steps:
- Locate the Search bar at the top of the Doctors table.
- Type any keyword (e.g., doctor name, email, or specialization).
17. How to Manage Patients
Overview: Clinic Administrators can add, view, edit, and manage patients in the system. When a patient is added, the system automatically sends an email containing a secure password setup link.
17.1 How to View the Patients List
Overview: The Patient Management page displays a table of all patients in your clinic.
Steps:
- From the left sidebar, click Patients.
- The Patient Management page opens, showing a table of all patients.
What the Patients Table Displays:
| Column | Description |
|---|---|
| # | Row number |
| PATIENT NAME | Patient's full name |
| Patient's email address | |
| PHONE | Patient's contact phone number |
| AGE | Patient's age (calculated from Date of Birth) |
| GENDER | Patient's gender (Male/Female/Other) |
| ASSIGNED DOCTOR | Primary treating physician |
| STATUS | Active or Discharged/Inactive |
| ADMISSION DATE | Date the patient was added to the system |
| ACTION | Edit button (✏️) or View button (👁️) |

Table Features:
| Feature | Description |
|---|---|
| Search patients | Search bar to filter patients by name, email, or doctor |
| Showing entries | Displays "Showing 1 to 1 of 1 patient." |
| Previous/Next | Pagination buttons to navigate between pages |
17.2 How to Add a New Patient
Overview: Add a patient to your clinic and assign them to a treating physician. The system automatically sends a welcome email containing a password setup link.
Steps:
- From the left sidebar, click Patients.
- Click the Add Patient button (usually above the table).
- Fill in the patient details:
Patient Demographics Form Fields:
| Field | Description | Required |
|---|---|---|
| Treating Physician | Select from your list of doctors | ✅ Yes |
| First Name | Patient's first name | ✅ Yes |
| Last Name | Patient's last name | ✅ Yes |
| Email Address | Patient's email address | ✅ Yes |
| Confirm Email Address | Re-enter email to confirm | ✅ Yes |
| Phone Number | Patient's contact number | ✅ Yes |
| Date of Birth | Patient's date of birth | ✅ Yes |
| Sex | Male, Female, or Other | ✅ Yes |
| Race / Ethnicity | Patient's race/ethnicity (e.g., White, Black, Asian, Hispanic) | Optional |
- Click Save Patient Demographics.
✅ The patient is added to the system. An automated email is sent to the patient with a password setup link.

Important Note about Email: As shown on the form, "Email cannot be changed for existing patients." Double-check the email address before saving.
17.3 How to Edit a Patient (Update Demographics)
Overview: You can edit patient information at any time. However, email addresses for existing patients cannot be changed (as indicated in the form).
- In the Patients table, locate the patient.
- In the ACTION column, click the Edit button (✏️ pencil icon).
- The Patient Demographics form opens with all current information pre-filled.
- Update the necessary fields.
- Click Update Patient Demographics.
What you can edit:
| Field | Editable? | Notes |
|---|---|---|
| Treating Physician | ✅ Yes | Can be assigned to a different doctor |
| First Name | ✅ Yes | |
| Last Name | ✅ Yes | |
| Email Address | ❌ No | "Email cannot be changed for existing patients." |
| Phone Number | ✅ Yes | |
| Date of Birth | ✅ Yes | Age will recalculate automatically |
| Sex | ✅ Yes | |
| Race / Ethnicity | ✅ Yes |

After Editing:
✅ Patient information is updated immediately.
✅ Changes are reflected in the Patients table.
✅ No email notification is sent for demographic updates.
17.4 How to Search for Patients
Overview: Use the search bar to quickly find specific patients by name, email, or assigned physician.
Steps:
- Locate the Search patients bar at the top of the Patients table.
- Enter the keyword (e.g., patient name, email, or doctor name).
- The table automatically filters to show only matching results.
Search Examples:
17.5 Patient Email Notification Workflow (Automatic)
Overview: When a Clinic Administrator adds a patient, the system automatically sends the patient an email.
The email includes:
| Information | Description |
|---|---|
| Password setup link | Secure link to create account password |
Account Setup Flow for Patients:
| Step | Action |
|---|---|
| 1 | The patient receives the email with the secure setup link. |
| 2 | They click the link and create their account password. |
| 3 | After setup, the patient can log in to the Patient Portal to manage their activities (e.g., submit follow-up questionnaires). |

⚠️ Important Note: You do not need to create a password for the patient manually. The system handles this automatically via the email link.
17.6 How to Manage Patient Cases
Overview: From the patient record, you can add and manage the patient's clinical cases.
Steps:
- From the Patients table, locate the patient.
- Click the View Patient (👁️) button.
- On the Patient Case page, click Add New Case to create a new case.

For detailed case management instructions, refer to:
- Section 18: How to Add a Patient Case
- Section 19: Case Workflow (Step-by-Step)
17.6.1 How to Delete an Entire Patient Record
Overview: If a patient leaves your clinic or was added in error, you can delete the entire patient record. A confirmation modal appears to prevent accidental deletion.
Steps to Delete a Patient:
| Step | Action |
|---|---|
| 1 | From the left sidebar, click Patients. |
| 2 | Locate the patient in the Patients table. |
| 3 | Click the Delete button (trash icon) in the Actions section. |
| 4 | A confirmation modal appears. |
| 5 | Click Yes, Delete to confirm deletion. |
| 6 | Click Cancel to abort and keep the patient. |

18. How to Add a Patient Case
Overview: Create a new clinical case for an existing patient. When you add a case with a Treatment Start Date, the system automatically schedules follow-ups, sends email notifications to the patient, and alerts the doctor when questionnaires are completed.
18.1 Steps to Add a Case
- From the Patients table, click View Patient
- Click Add New Case
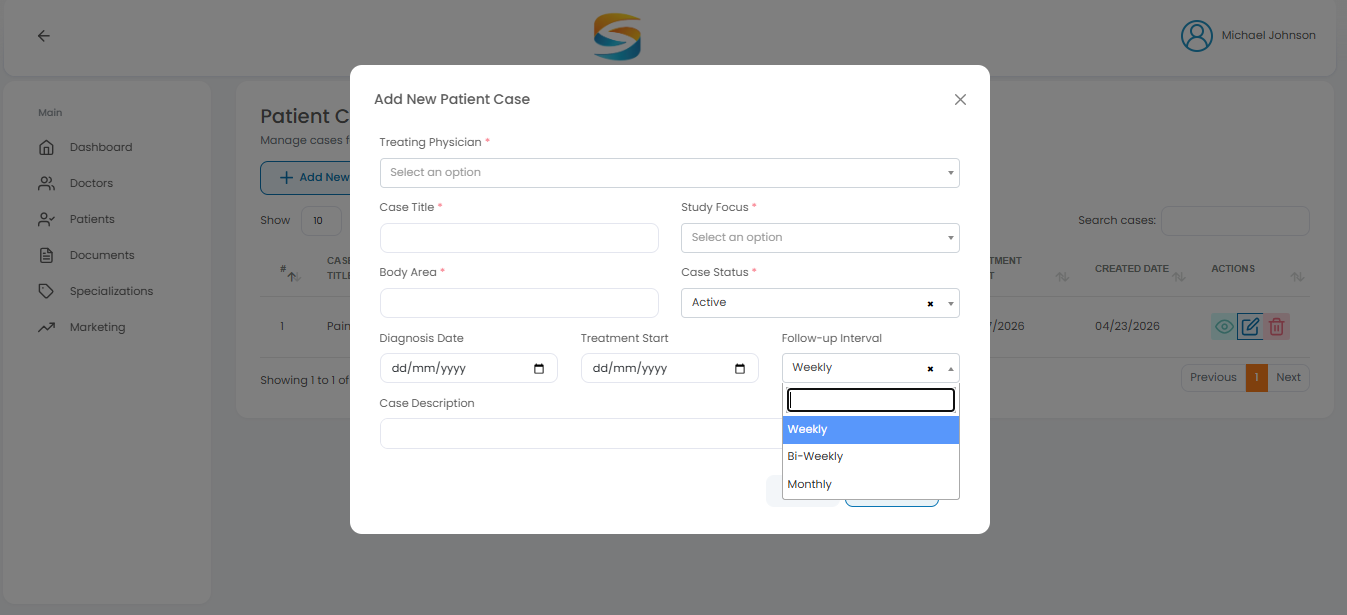
- Fill in the required fields:
| Field | Options |
|---|---|
| Treating Physician | Select from the doctor list |
| Case Title | Enter title |
| Study Focus | Wound Healing / Pain / Orthopedic |
| Body Area | Enter area (e.g., Knee, Spine) |
| Case Status | Active / Pending / Closed |
| Diagnosis Date | Select date |
| Treatment Start Date | Select date |
| Follow-up Interval | Weekly / Biweekly / Monthly |
| Description | Optional notes |

18.2 Study Focus Options
| Study Focus | Used For |
|---|---|
| Wound Healing | Chronic wounds, surgical wounds |
| Pain | Chronic or acute pain management |
| Orthopedic | Bones, joints, ligaments |

18.3 Follow-up Interval Options
| Interval | Schedule |
|---|---|
| Weekly | Every 7 days |
| Biweekly | Every 14 days |
| Monthly | Every 30 days |
Note: If no interval is selected, Weekly is the default.
18.4 Schedule Date & Due Date
| Term | Meaning |
|---|---|
| Schedule Date | The day follow-up is created |
| Due Date | Schedule Date + 3 days |
Example:
| Schedule Date | Due Date |
|---|---|
| April 23, 2026 | April 26, 2026 |
18.5 Automatic Workflow (After Saving)
| Step | Action |
|---|---|
| 1 | The system creates the first follow-up. |
| 2 | System sets Due Date = Schedule Date + 3 days |
| 3 | Email sent to patient with Due Date. |
| 4 | Patient completes questionnaire |
| 5 | Email & notification sent to the doctor |
| 6 | Next follow-up created |
| 7 | Process repeats automatically |
18.6 Email Notifications
| Notification | Sent To | When |
|---|---|---|
| Follow-up ready | Patient | When a follow-up is created |
| Questionnaire completed | Doctor | When the patient submits |
18.7 Important Rules
| Rule | Description |
|---|---|
| Treatment Start Date | Required for follow-ups |
| Due Date | Always 3 days after the Schedule Date |
| Repeat | Follow-ups continue automatically |
| Next Follow-up | Created only after the patient completes the current |
18.6 Email Notifications (Detailed)
Email #1: Sent to Patient
Trigger: When a follow-up is created (Schedule Date)

Email #2: Sent to Doctor
Trigger: When the patient submits the questionnaire

19. Case Workflow (Step-by-Step)
Overview: After creating a case, click View Case. The system guides you through 9 sections in order. Each section must be completed before the next section becomes available.
Important Follow-up Logic:
| Scenario | When Follow-up Creates |
|---|---|
| Treatment Start Date entered during case creation | Follow-up creates immediately |
| Treatment Start Date not entered during case creation | Follow-up is created when the Treatment Details page is saved |
19.1 Case Workflow Tabs
The following tabs appear at the top of the case page:
| Tab | Section |
|---|---|
| 1 | Consent |
| 2 | Baseline |
| 3 | Diagnosis & Condition |
| 4 | Treatment Details |
| 5 | Imaging Information |
| 6 | Adverse Events |
| 7 | Outcomes |
| 8 | Provider & Facility |
| 9 | Follow-Up |

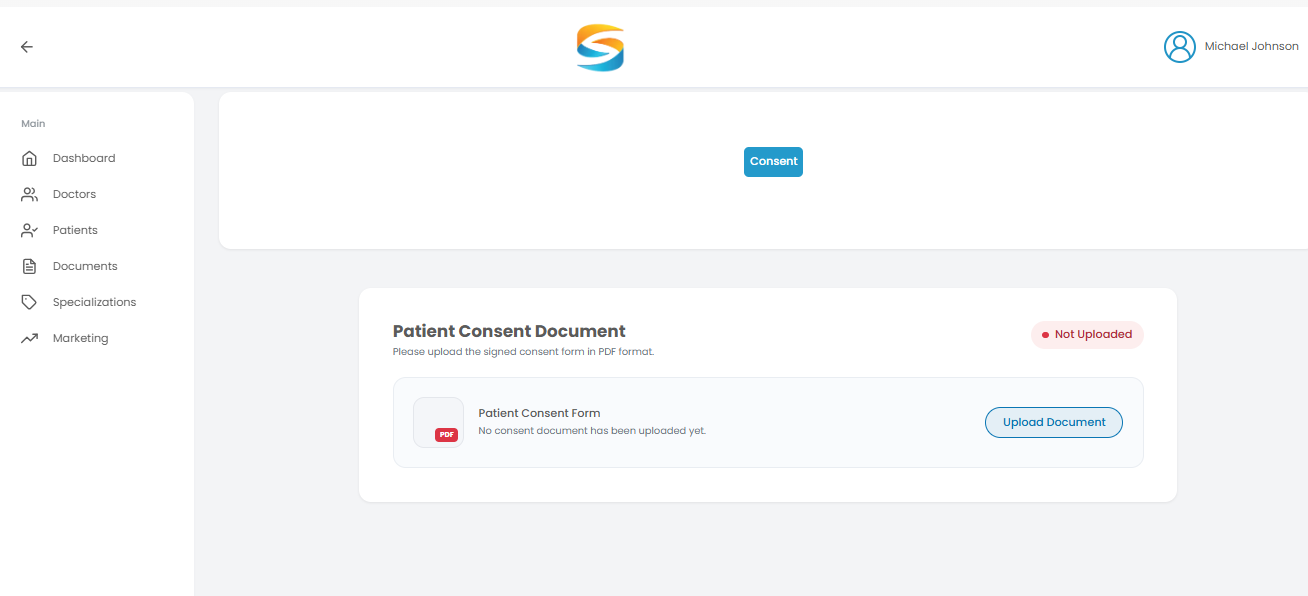
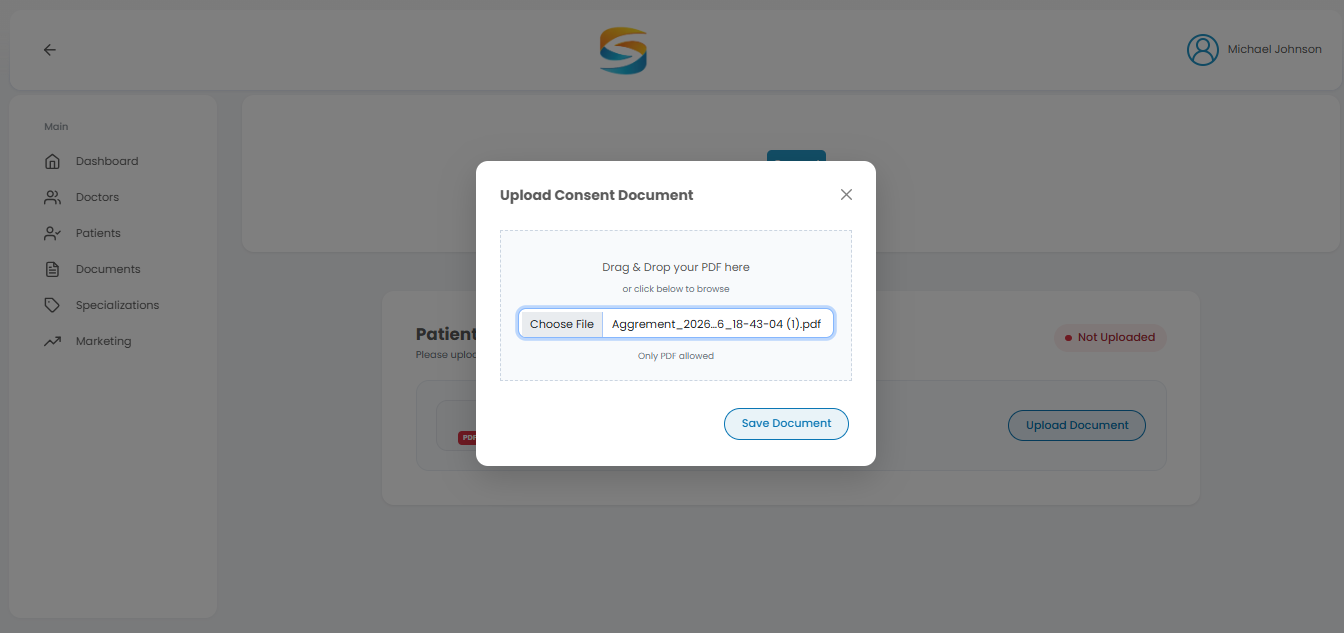
19.2 Tab 1: Patient Consent Document
Overview: Upload the patient's consent document. This is mandatory.
Steps:
- Click Upload or Choose File
- Select the consent PDF file
- Click Save
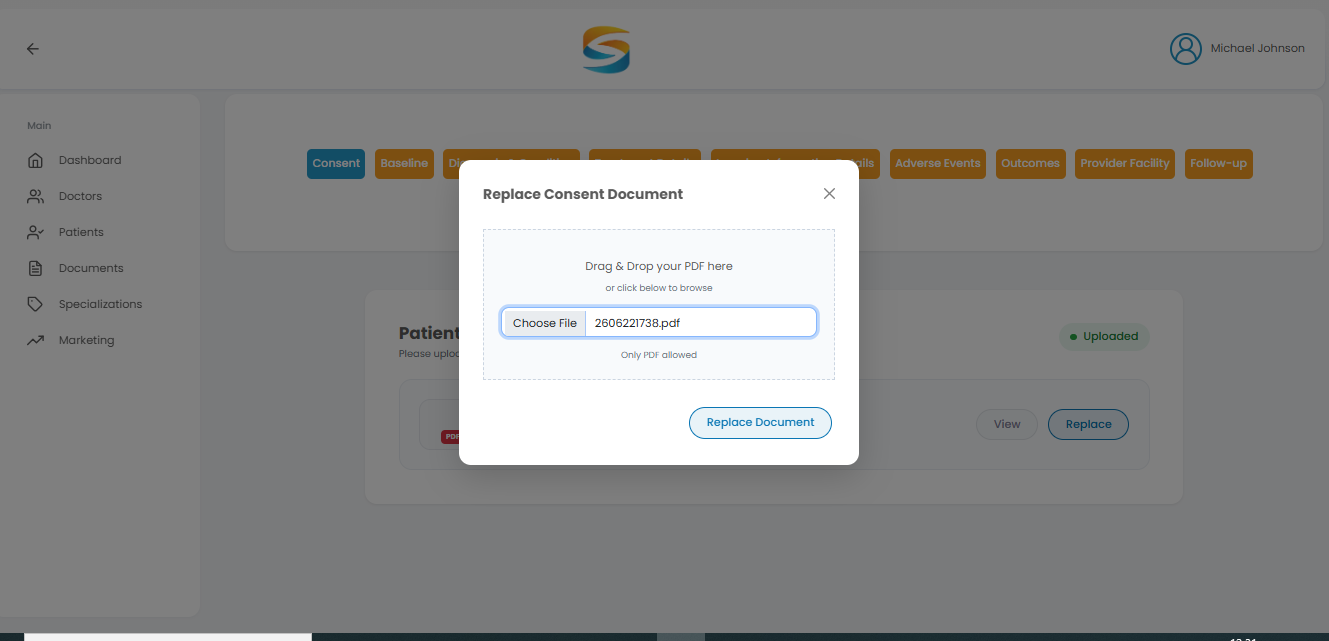
✅ After uploading, you can view or replace the document.

19.3 Tab 2: Baseline Information
Overview: Enter the patient's baseline clinical data.
Sections:
| Section | Information Collected |
|---|---|
| Physical Measurements | Height (Feet/Inches), Weight (lbs), BMI (auto-calculated) |
| Medical History | Comorbidities, Allergies, Prior Surgical Treatments, Smoking Status, Additional Notes |
| Medication History | Current Medications, Prior Medical Treatments |
Steps:
- Fill in all baseline fields
- Click Save Baseline

19.4 Tab 3: Diagnosis & Condition
Overview: Add diagnosis details. Fields vary based on the Study Focus (Pain / Orthopedic / Wound Healing) selected during case creation.
Fields:
| Field | Description |
|---|---|
| Condition Type | Primary diagnosis |
| ICD-10 Diagnosis Codes | Standard diagnosis codes |
| Infection Status | Present or Absent |
| Pain Type | Select from options (for Pain study focus) |
| Baseline Pain Score | VAS or NRS score 0-10 (for Pain study focus) |
| Notes / Comments | Additional diagnostic notes |
Steps:
- Fill in all diagnosis fields
- Click Save Diagnosis & Condition

19.5 Tab 4: Treatment Details
Overview: Enter treatment information. This section triggers follow-up creation.
Fields:
| Field | Description |
|---|---|
| Treatment Start Date | Date treatment began |
| Procedure Code(s) | Medical procedure codes |
| Product Type | e.g., Stem Cells, Exosomes |
| Product Source | e.g., Autologous, Allogeneic |
| Batch/Lot Number | Product identifier |
| Dose | Amount administered |
| Volume | Volume of product |
| Administration Method | e.g., Injection, Topical |
| Application Frequency | How often is treatment applied |
| Treatment Notes / Comments | Additional notes |
Steps:
- Enter or verify Treatment Start Date
- Fill in all treatment fields
- Click Save Treatment Details
✅ After saving, follow-ups are created automatically if they were not created during case creation.

19.6 Tab 5: Imaging Information
Overview: Upload imaging files and add findings.
Sections:
| Section | Information |
|---|---|
| Type of Imaging | Select imaging modality |
| Timing | Baseline, Week 4, Week 8, or Week 12 |
| Upload Imaging Files | Upload imaging files (PDF, DICOM, JPG, PNG) |
| Findings | Enter text OR upload findings document |
| Standardized Scoring | Enter text OR upload scoring document |
| Additional Notes | Optional clinical comments |
Steps:
- Select Type of Imaging and Timing
- Upload imaging files
- Enter findings as text OR upload a document
- Enter scoring as text OR upload document (optional)
- Click Save Imaging Information

19.7 Tab 6: Adverse Events
Overview: Record adverse events. The risks shown are based on the study's focus.
Fields:
| Field | Description |
|---|---|
| Adverse Event Description | Describe the event, symptoms, onset, and progression |
| Severity | Select severity level |
| Timing | e.g., within 24h, 7 days post-treatment |
| Causality | Relationship to treatment |
| Outcomes | Describe resolution and interventions |
| Specific Risk Category | Select relevant risk categories |
| Additional Custom Risk | Enter any risk not listed |
Steps:
- Fill in all adverse event fields
- Click Save Adverse Events

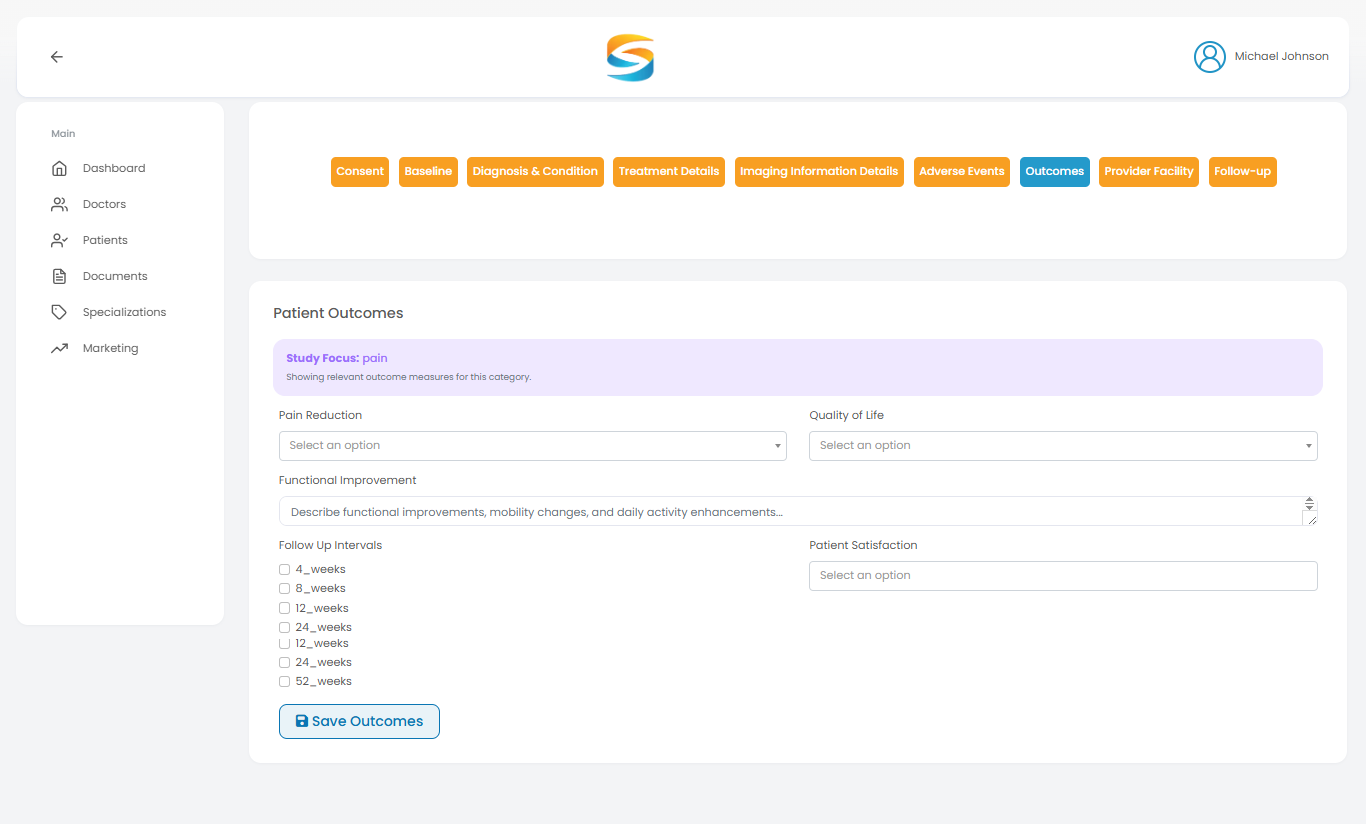
19.8 Tab 7: Outcomes
Overview: Enter treatment outcomes. Outcome measures are determined by the study focus.
Fields:
| Field | Description |
|---|---|
| Pain Reduction | Percentage of pain reduction |
| Quality of Life | Patient-reported quality of life change |
| Functional Improvement | Describe improvements in function |
| Follow-Up Intervals | Select applicable intervals (4, 8, 12, 24, 52 weeks) |
Steps:
- Select Pain Reduction percentage
- Select Quality of Life change
- Enter Functional Improvement description
- Select Follow-Up Intervals
- Click Save Outcomes
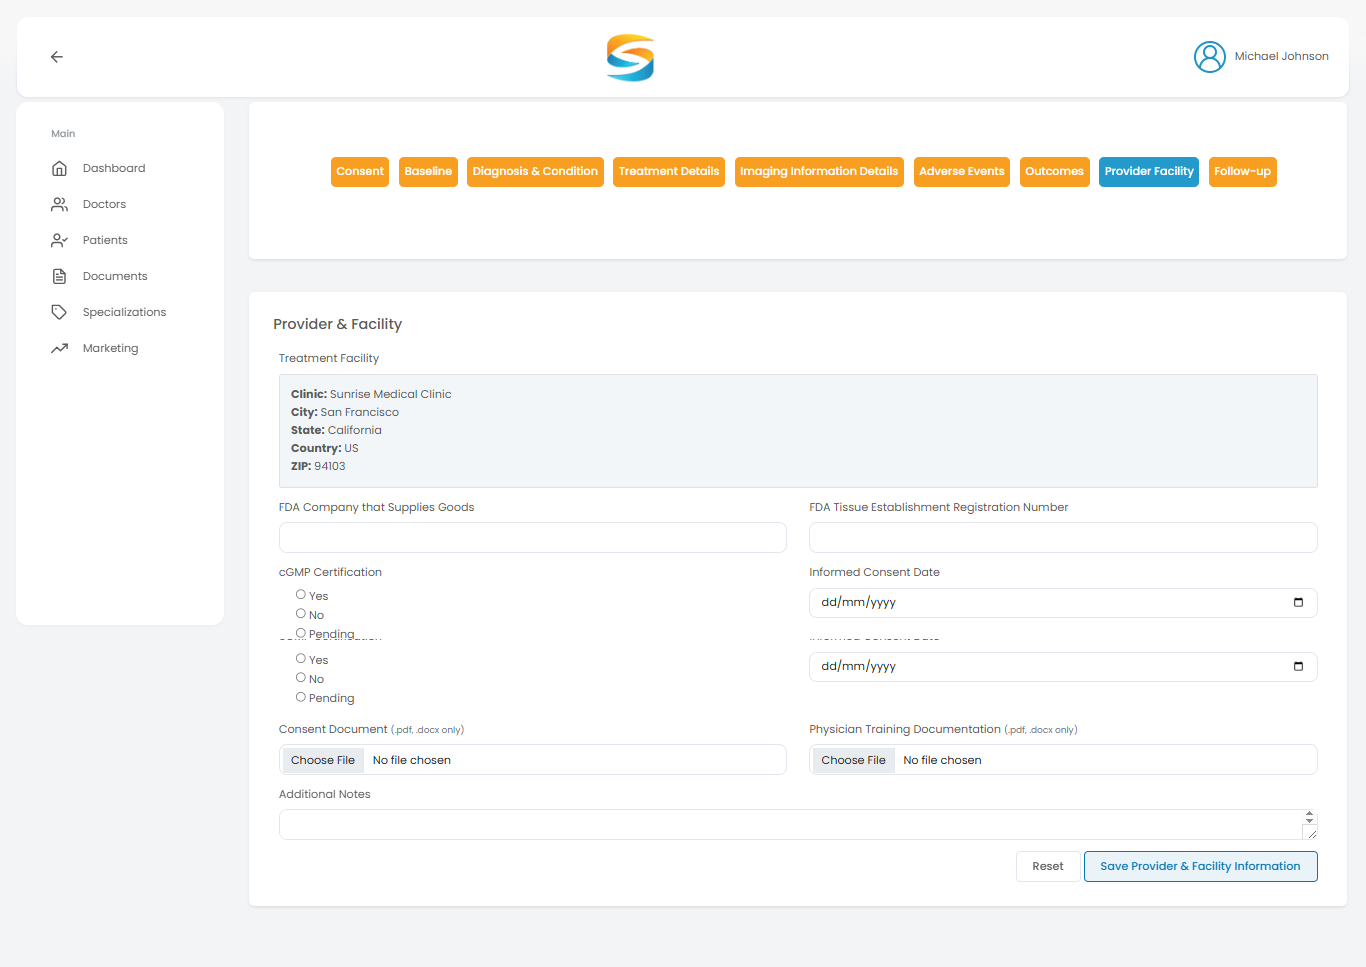
19.9 Tab 8: Provider & Facility
Overview: Enter treatment facility and physician training information.
Sections:
| Section | Information Collected |
|---|---|
| Treatment Facility | Clinic, City, State, Country, ZIP, FDA information, cGMP Certification, Consent Document, Additional Notes |
| Physician Training Documentation | Upload training documents (PDF, DOCX) |
Buttons:
| Button | Action |
|---|---|
| Reset | Clear unsaved changes |
| Save Provider & Facility Information | Save all data |
Steps:
- Fill in all facility fields
- Upload training documentation
- Click Save Provider & Facility Information
19.10 Tab 9: Follow-Up
Overview: View follow-up schedules and patient-submitted questionnaires.
Follow-Up Table Displays:
| Column | Description |
|---|---|
| # | Follow-up number |
| SCHEDULED DATE | Date follow-up was created |
| DUE DATE | Scheduled Date + 3 days |
| STUDY FOCUS | Pain / Orthopedic / Wound Healing |
| STATUS | Scheduled / Completed / Late / Missed |
| COMPLETED AT | Date and time of submission |
| ACTION | View Questionnaire button (when completed) |
Actions:
| Action | Description |
|---|---|
| Create Schedule | Manually create a new follow-up |
| View Questionnaire | View patient responses (completed only) |
Steps:
- Click Create Schedule to add a follow-up (if needed) manually
- For completed follow-ups, click View Questionnaire to review responses


Manually update the follow up:


Questionnaire View:

19.11 After All Pages: View & Edit
How to View Data:
- Click any tab to view saved information
How to Edit Data:
- Click the tab you want to edit
- Update the fields
- Click Save at the bottom of the page
19.12 Quick Troubleshooting
| Issue | Solution |
|---|---|
| Cannot access other tabs | Complete Tab 1 (Consent) first. |
| Cannot view questionnaire | Patient has not completed follow-up yet. |
20. Documents Section
The Documents section allows you to access and download important clinic-related files.
| Available Documents | Key Features |
|---|---|
|
• Patient Consent Form • Study Protocol Documents • Other official clinic documents |
• View available documents • Download documents securely • Access updated files anytime |
Distributor Documents: If a Distributor uploads documents, they will also appear in this section for clinics to view and download.
📌 Important Notes: All documents are secure and tracked. Always download the latest version before use.

21. Marketing Page (Distributor Only)
The Marketing section is used to configure clinic marketing settings.
| Access Condition | Purpose |
|---|---|
| This page is only visible to clinics associated with a Zizion Distributor. | Set up clinic marketing profile and configure AMP sub-account. |
Steps to Complete Marketing Setup:
- Go to Marketing from the sidebar.
- Fill in the required business details:
| Section | Fields |
|---|---|
| Basic Information | Business Name, Legal Business Name, Business Email, Phone Number, Website URL |
| Additional Details | Business Category / Niche, Currency, Industry Type |
- Click Submit.
